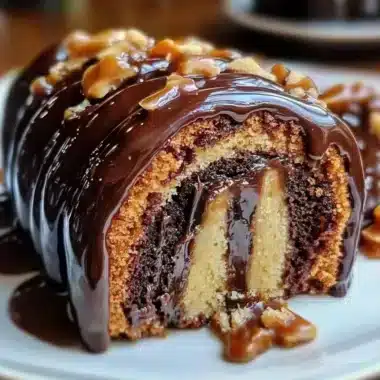
Red Velvet Cheesecake is a delightful fusion of flavors that brings together the richness of cheesecake with the iconic taste of red velvet cake. This dessert is not only visually stunning with its vibrant red hue, but it also offers an incredible taste that is both creamy and decadent. The velvety texture combined with the slight tang of cream cheese creates a dessert that is simply unforgettable. Perfect for special occasions, gatherings, or just a treat for yourself, this Red Velvet Cheesecake is sure to impress anyone who takes a bite.
If you’ve ever craved a dessert that stands out both in presentation and flavor, Red Velvet Cheesecake is the answer. The first slice reveals a smooth, rich filling that melts in your mouth, leaving you wanting more. This cheesecake isn’t just about taste; it’s a celebration of flavors that harmoniously blend together, evoking feelings of joy and indulgence. In this guide, you will discover why this recipe is so special, how to prepare it, and tips on serving it perfectly. Whether you’re a novice baker or a seasoned pro, this amazing Red Velvet Cheesecake will surely be a hit among family and friends.
With its combination of cocoa, cream cheese, and a hint of vanilla, this dessert is designed to be a centerpiece for any event. The presentation alone will earn you compliments, and the flavors will leave your guests raving about it long after the last slice is gone. So let’s dive into what makes Red Velvet Cheesecake an ultimate dessert experience!
Why You’ll Love This Recipe
Red Velvet Cheesecake is a unique and tantalizing dessert that captivates the senses. Here are some reasons why you’ll fall in love with this recipe:
1. Stunning Presentation: The vibrant red color against the creamy white cheesecake creates a visually appealing treat.
2. Delicious Flavor Combination: The rich, buttery flavor of red velvet perfectly complements the tangy cream cheese filling.
3. Versatile Dessert: Suitable for all occasions, from birthdays to holidays, or simply as a delightful weekend treat.
4. Easy to Make: With simple steps and readily available ingredients, even beginners can create this wonderful dessert.
5. Impressive Texture: The creamy cheesecake layer contrasts beautifully with the light and fluffy red velvet cake base.
6. Perfect for Sharing: This cheesecake is ideal for gatherings, ensuring everyone gets a taste of its incredible flavor.
Each of these factors contributes to why Red Velvet Cheesecake is a beloved recipe. You’ll be eager to share it with your loved ones and enjoy the delightful surprise as they take their first bite!
Preparation and Cooking Time
Making Red Velvet Cheesecake is a rewarding experience that requires careful timing. Here’s a breakdown of the time involved:
– Preparation Time: 30 minutes
– Cooking Time: 1 hour
– Cooling Time: 2 hours
– Total Time: Approximately 3 hours and 30 minutes
The cooling time is essential for the cheesecake to set properly, so be sure to plan ahead for the best results.
Ingredients
– For the Red Velvet Cake Layer:
– 1 ½ cups all-purpose flour
– 1 cup granulated sugar
– ½ cup unsweetened cocoa powder
– 1 teaspoon baking soda
– ½ teaspoon salt
– 1 cup vegetable oil
– 1 cup buttermilk, at room temperature
– 2 large eggs
– 2 tablespoons red food coloring
– 1 teaspoon vanilla extract
– 1 teaspoon white vinegar
– For the Cream Cheese Layer:
– 16 oz cream cheese, softened
– ½ cup granulated sugar
– 2 large eggs
– 1 teaspoon vanilla extract
– 2 tablespoons all-purpose flour
– 1 tablespoon lemon juice (optional)
– For the Topping:
– Whipped cream (optional)
– Red velvet cake crumbs (optional, for garnish)
Step-by-Step Instructions
Creating a Red Velvet Cheesecake is straightforward if you follow these steps:
1. Preheat the Oven: Preheat your oven to 325°F (160°C). Grease a 9-inch springform pan and wrap the outside with aluminum foil to prevent water from seeping in.
2. Prepare the Red Velvet Cake Batter:
– In a mixing bowl, combine flour, sugar, cocoa powder, baking soda, and salt.
– In another bowl, whisk together the oil, buttermilk, eggs, food coloring, vanilla extract, and vinegar.
– Gradually add the wet ingredients to the dry ingredients and mix until smooth.
3. Bake the Cake Layer:
– Pour the red velvet batter into the prepared springform pan.
– Bake in the preheated oven for about 25-30 minutes or until a toothpick inserted in the center comes out clean.
4. Cool the Cake:
– Remove the cake from the oven and let it cool completely in the pan on a wire rack.
5. Prepare the Cream Cheese Layer:
– In a large mixing bowl, beat the softened cream cheese until smooth.
– Add the sugar, eggs, vanilla extract, flour, and lemon juice (if using) and mix until well combined.
6. Assemble the Cheesecake:
– Once the red velvet cake has cooled, pour the cream cheese mixture over the top.
– Smooth the surface with a spatula.
7. Bake the Cheesecake:
– Place the springform pan in a larger baking pan filled with water (water bath).
– Bake for an additional 30-35 minutes or until the cheesecake is set but slightly jiggly in the center.
8. Cool the Cheesecake:
– Turn off the oven and leave the cheesecake inside for an hour to cool gradually.
– Remove from the oven and refrigerate for at least 2 hours, preferably overnight.
9. Release the Cheesecake:
– Once chilled, carefully run a knife around the edges of the springform pan before releasing the sides.
10. Garnish:
– Top with whipped cream and red velvet cake crumbs for an impressive finish.
How to Serve
Serving Red Velvet Cheesecake can enhance the overall experience. Here are some ideas to make it memorable:
1. Presentation: Use a decorative cake stand to showcase the cheesecake, allowing its vibrant color to stand out.
2. Slice Sizes: Cut generous slices, but not too large, to encourage guests to enjoy seconds without feeling overwhelmed.
3. Accompaniments: Pair with fresh berries, chocolate sauce, or a scoop of vanilla ice cream to complement the flavors.
4. Beverage Pairing: Serve with coffee, milk, or a dessert wine to elevate the dining experience.
5. Garnishing: Add extra whipped cream on the side and sprinkle with red velvet crumbs for a stunning visual appeal.
By putting thought into how you serve this delightful dessert, you create an unforgettable experience for your guests, ensuring that Red Velvet Cheesecake is the highlight of any occasion!
Additional Tips
– Use Room Temperature Ingredients: For the creamiest texture, ensure your cream cheese and eggs are at room temperature before mixing. This helps achieve a smoother batter.
– Be Mindful of Baking Time: Every oven is different. Start checking for doneness a few minutes before the suggested time to prevent overbaking.
– Add a Touch of Lemon: A splash of lemon juice in the cream cheese layer can brighten the flavors and cut through the richness.
Recipe Variation
Feel free to experiment with these variations to customize your Red Velvet Cheesecake:
1. Chocolate Chip Addition: Fold in some semi-sweet chocolate chips into the cream cheese layer for a delightful surprise.
2. Red Velvet Swirl: For a marbled effect, gently swirl the cream cheese mixture into the red velvet layer before baking.
3. Nutty Twist: Add crushed pecans or walnuts to the red velvet layer for an added crunch.
Freezing and Storage
– Storage: Keep your Red Velvet Cheesecake covered in the refrigerator. It can last for up to one week.
– Freezing: To freeze, wrap individual slices in plastic wrap and store them in an airtight container. They can be frozen for up to three months.
Special Equipment
To successfully prepare the Red Velvet Cheesecake, you’ll need the following tools:
– 9-inch springform pan
– Mixing bowls
– Electric mixer or whisk
– Rubber spatula
– Measuring cups and spoons
– Aluminum foil (for wrapping the pan)
Frequently Asked Questions
Can I use a different type of food coloring?
Yes, gel food coloring is recommended for the best color intensity. Liquid food coloring may work but could alter the consistency of your batter.
How should I store leftover cheesecake?
Store any leftovers in an airtight container in the refrigerator for up to a week.
Can I make this cheesecake gluten-free?
Absolutely! Substitute the all-purpose flour with a gluten-free flour blend.
What can I serve with the cheesecake?
This cheesecake pairs wonderfully with fresh berries or a drizzle of chocolate or caramel sauce.
Is it necessary to use a water bath?
While not mandatory, a water bath helps prevent cracking by keeping the cheesecake moist during baking.
Conclusion
Red Velvet Cheesecake is more than just a dessert; it’s an experience that captures the essence of indulgence. Its unique blend of flavors and textures makes it a standout choice for any celebration. Whether you’re serving it at a birthday party, holiday gathering, or simply enjoying a slice at home, this cheesecake is sure to make a lasting impression. With the tips, variations, and serving suggestions provided, you’re well-equipped to create a stunning and delicious Red Velvet Cheesecake that will leave everyone craving more.

Red Velvet Cheesecake: An Amazing Ultimate Recipe
- Total Time: 1 hour 30 minutes
Ingredients
– For the Red Velvet Cake Layer:
– 1 ½ cups all-purpose flour
– 1 cup granulated sugar
– ½ cup unsweetened cocoa powder
– 1 teaspoon baking soda
– ½ teaspoon salt
– 1 cup vegetable oil
– 1 cup buttermilk, at room temperature
– 2 large eggs
– 2 tablespoons red food coloring
– 1 teaspoon vanilla extract
– 1 teaspoon white vinegar
– For the Cream Cheese Layer:
– 16 oz cream cheese, softened
– ½ cup granulated sugar
– 2 large eggs
– 1 teaspoon vanilla extract
– 2 tablespoons all-purpose flour
– 1 tablespoon lemon juice (optional)
– For the Topping:
– Whipped cream (optional)
– Red velvet cake crumbs (optional, for garnish)
Instructions
Creating a Red Velvet Cheesecake is straightforward if you follow these steps:
1. Preheat the Oven: Preheat your oven to 325°F (160°C). Grease a 9-inch springform pan and wrap the outside with aluminum foil to prevent water from seeping in.
2. Prepare the Red Velvet Cake Batter:
– In a mixing bowl, combine flour, sugar, cocoa powder, baking soda, and salt.
– In another bowl, whisk together the oil, buttermilk, eggs, food coloring, vanilla extract, and vinegar.
– Gradually add the wet ingredients to the dry ingredients and mix until smooth.
3. Bake the Cake Layer:
– Pour the red velvet batter into the prepared springform pan.
– Bake in the preheated oven for about 25-30 minutes or until a toothpick inserted in the center comes out clean.
4. Cool the Cake:
– Remove the cake from the oven and let it cool completely in the pan on a wire rack.
5. Prepare the Cream Cheese Layer:
– In a large mixing bowl, beat the softened cream cheese until smooth.
– Add the sugar, eggs, vanilla extract, flour, and lemon juice (if using) and mix until well combined.
6. Assemble the Cheesecake:
– Once the red velvet cake has cooled, pour the cream cheese mixture over the top.
– Smooth the surface with a spatula.
7. Bake the Cheesecake:
– Place the springform pan in a larger baking pan filled with water (water bath).
– Bake for an additional 30-35 minutes or until the cheesecake is set but slightly jiggly in the center.
8. Cool the Cheesecake:
– Turn off the oven and leave the cheesecake inside for an hour to cool gradually.
– Remove from the oven and refrigerate for at least 2 hours, preferably overnight.
9. Release the Cheesecake:
– Once chilled, carefully run a knife around the edges of the springform pan before releasing the sides.
10. Garnish:
– Top with whipped cream and red velvet cake crumbs for an impressive finish.
- Prep Time: 30 minutes
- Cook Time: 1 hour
Nutrition
- Serving Size: 12
- Calories: 450 kcal
- Fat: 30g
- Protein: 8g