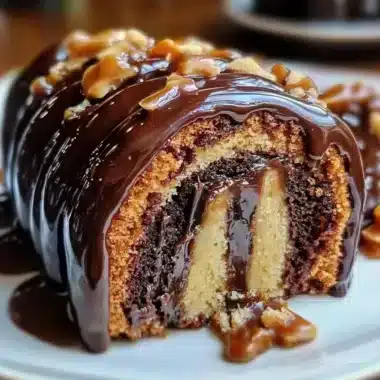
Red Velvet Cheesecake is a dessert that combines the best of both worlds: the rich, tangy flavor of cheesecake and the delightful, velvety texture of red velvet cake. This amazing dessert is perfect for special occasions or whenever you want to indulge in something truly delicious. The luscious layers and vibrant color make it a showstopper at any gathering, leaving your guests in awe. With its creamy filling and striking appearance, Red Velvet Cheesecake is not just a treat for the taste buds, but also a feast for the eyes.
If you’re looking to impress your friends and family, this recipe is sure to do the trick. The first bite will take you to dessert heaven, as the layers of red velvet and cheesecake melt in your mouth, creating a symphony of flavors. Whether it’s a birthday, anniversary, or a simple get-together, this cake is the perfect addition to any celebration. In this guide, we will explore why this recipe is so beloved, how to prepare it, and tips for serving.
The combination of flavors and textures in Red Velvet Cheesecake is unlike anything else. The moist, chocolatey red velvet cake pairs perfectly with the rich, creamy cheesecake filling, creating an unforgettable dessert experience. Let’s dive into what makes Red Velvet Cheesecake a must-try recipe for dessert lovers everywhere!
Why You’ll Love This Recipe
Red Velvet Cheesecake is a dessert that stands out for many reasons. Here are just a few factors that will make you fall head over heels for this recipe:
1. Delicious Flavor: The combination of tangy cream cheese and sweet red velvet cake creates a unique flavor profile that is irresistible.
2. Stunning Presentation: Its striking red color and creamy white layers make it a visually appealing dessert that will wow your guests.
3. Versatile Recipe: This cheesecake can be served at various occasions, from holidays to casual get-togethers, making it a versatile dessert option.
4. Easy to Customize: You can easily adjust the recipe to include different toppings or add layers if you desire.
5. Family-Friendly: This dessert is loved by both kids and adults, making it a great choice for family gatherings.
6. Impressive Yet Simple: Though it looks fancy, the recipe is straightforward and can be made by cooks of all skill levels.
With these enticing points in mind, you can see why Red Velvet Cheesecake is a favorite among dessert enthusiasts. This delightful treat is sure to leave a lasting impression!
Preparation and Cooking Time
Preparing Red Velvet Cheesecake takes a bit of time, but the results are well worth the effort. Here’s a breakdown of the time required:
– Preparation Time: 30-40 minutes
– Cooking Time: 60-70 minutes
– Cooling Time: 4-6 hours (or overnight for best results)
Overall, you should plan for about 5-7 hours from start to finish, including cooling time. This dessert is perfect for making ahead of time, allowing the flavors to meld together beautifully.
Ingredients
– For the Red Velvet Cake Layer:
– 2 cups all-purpose flour
– 1 ½ cups granulated sugar
– 1 teaspoon baking soda
– 1 teaspoon salt
– 1 teaspoon cocoa powder
– 1 ½ cups vegetable oil
– 1 cup buttermilk, at room temperature
– 2 large eggs, at room temperature
– 2 tablespoons red food coloring
– 1 teaspoon vanilla extract
– 1 teaspoon white vinegar
– For the Cheesecake Layer:
– 24 ounces cream cheese, softened
– 1 cup granulated sugar
– 1 teaspoon vanilla extract
– 3 large eggs, at room temperature
– ½ cup sour cream
– For the Cream Cheese Frosting (optional):
– 8 ounces cream cheese, softened
– ½ cup unsalted butter, softened
– 4 cups powdered sugar
– 1 teaspoon vanilla extract
Step-by-Step Instructions
Creating Red Velvet Cheesecake is easier than you might think. Follow these steps to make your own:
1. Preheat the Oven: Preheat your oven to 350°F (175°C). Grease and line a 9-inch springform pan with parchment paper.
2. Prepare the Red Velvet Cake:
– In a large bowl, sift together the flour, sugar, baking soda, salt, and cocoa powder.
– In another bowl, mix the vegetable oil, buttermilk, eggs, food coloring, vanilla extract, and vinegar until smooth.
– Gradually add the wet ingredients to the dry ingredients, stirring until combined.
– Pour the red velvet batter into the prepared springform pan and smooth the top.
3. Bake the Cake: Place the pan in the preheated oven and bake for 25-30 minutes. A toothpick inserted into the center should come out clean. Remove from the oven and let it cool completely in the pan.
4. Prepare the Cheesecake Layer:
– In a large bowl, beat the softened cream cheese until smooth and creamy.
– Gradually add the granulated sugar and vanilla extract, mixing until combined.
– Add the eggs one at a time, mixing on low speed after each addition. Finally, mix in the sour cream until smooth.
5. Assemble the Cheesecake:
– Once the red velvet cake has cooled, pour the cheesecake batter on top of the cake layer in the springform pan.
– Place the springform pan in a larger baking dish filled with hot water (this is a water bath) to help the cheesecake cook evenly.
6. Bake the Cheesecake: Bake for 60-70 minutes, or until the edges are set and the center is slightly jiggly. Turn off the oven and crack the door, letting the cheesecake cool gradually for about an hour.
7. Chill: After cooling in the oven, remove the cheesecake from the water bath and refrigerate for at least 4 hours, or overnight if possible.
8. Prepare the Cream Cheese Frosting (if desired):
– In a bowl, beat the cream cheese and butter until creamy.
– Gradually add the powdered sugar and vanilla extract, mixing until smooth.
9. Serve: Once chilled, remove the cheesecake from the springform pan. If using frosting, spread it over the top and sides of the cheesecake for an extra touch.
How to Serve
To serve Red Velvet Cheesecake in an impressive manner, consider the following tips:
1. Presentation: Use a decorative cake stand to elevate its look. A simple design adds elegance to the presentation.
2. Garnishes: Consider topping with fresh berries, chocolate shavings, or a drizzle of chocolate sauce for added flair.
3. Slice Size: Cut generous slices, but not overly large. Encouraging smaller portions allows guests to enjoy seconds!
4. Beverage Pairing: Pair the cheesecake with coffee, hot chocolate, or dessert wine to enhance the overall experience.
By focusing on presentation and pairing, you can elevate the experience of serving Red Velvet Cheesecake, making it memorable for both you and your guests. Enjoy this incredible dessert and the smiles it brings!
Additional Tips
– Use Quality Ingredients: For the best flavor, use high-quality cream cheese and cocoa powder. Fresh ingredients enhance the overall taste of your Red Velvet Cheesecake.
– Allow Ingredients to Reach Room Temperature: Ensure that your cream cheese, eggs, and sour cream are at room temperature before mixing. This helps create a smooth and creamy cheesecake filling.
– Use a Water Bath: Baking your cheesecake in a water bath prevents cracking and ensures even cooking. It allows for gentle heat distribution throughout the cheesecake.
– Don’t Overmix: When mixing the cheesecake batter, avoid overmixing once you add the eggs. Overmixing can incorporate too much air, leading to cracks.
– Chill Completely: Allow the cheesecake to chill for at least 4 hours, or preferably overnight. This lets the flavors develop and improves the texture.
Recipe Variation
Feel free to switch things up! Here are a few variations to consider:
1. Chocolate Ganache Topping: Drizzle a rich chocolate ganache over the cheesecake for an extra layer of indulgence.
2. Different Flavors: Experiment by adding flavorings like almond extract or lemon zest to the cheesecake batter for a unique twist.
3. Layered Treats: Create individual servings by layering cheesecake and red velvet cake in dessert cups for an elegant presentation.
4. Nutty Crunch: Add crushed nuts, like pecans or walnuts, to the crust for an added crunch and flavor.
5. Mini Cheesecakes: For a fun variation, make mini red velvet cheesecakes using a muffin tin. Adjust baking time accordingly.
Freezing and Storage
– Storage: Keep your Red Velvet Cheesecake covered in the refrigerator. Properly stored, it should last 4-5 days.
– Freezing: You can freeze slices of the cheesecake for up to 3 months. Wrap each slice tightly in plastic wrap and then place in an airtight container to prevent freezer burn.
Special Equipment
You will need a few essential tools to prepare Red Velvet Cheesecake successfully:
– 9-inch springform pan: Ideal for baking and serving the cheesecake.
– Mixing bowls: For combining ingredients.
– Electric mixer: To achieve a smooth and creamy cheesecake batter.
– Parchment paper: Useful for lining the bottom of the springform pan.
– Baking dish: To create a water bath for even baking.
Frequently Asked Questions
How do I know when the cheesecake is done baking?
Gently shake the pan. The edges should be set, while the center remains slightly jiggly. It will firm up as it cools.
Can I make this cheesecake ahead of time?
Yes, preparing the cheesecake a day or two before serving is highly recommended. This allows the flavors to meld beautifully.
Is this cheesecake suitable for dietary restrictions?
You can adapt the recipe for gluten-free diets by using gluten-free flour. Additionally, substitute dairy-free cream cheese for a dairy-free option.
Can I eliminate the food coloring?
Yes, you can omit the red food coloring if you prefer a traditional cheesecake look. The flavor will remain delicious.
What if my cheesecake cracks during baking?
Cracks are common but can be avoided by following the water bath method and not overbaking. If a crack occurs, you can cover it with frosting or ganache for a decorative finish.
Conclusion
Red Velvet Cheesecake is a decadent dessert that beautifully combines the best flavors of red velvet and cheesecake. Its rich taste and stunning presentation make it a favorite for any occasion. Whether you serve it at a special celebration or enjoy it as a delightful treat, this dessert is sure to impress. With its creamy layers and vibrant color, Red Velvet Cheesecake is more than just a dessert; it is an experience that will leave your guests craving more.

Red Velvet Cheesecake: An Incredible Ultimate Recipe You Need to Try
- Total Time: 23 minute
Ingredients
– For the Red Velvet Cake Layer:
– 2 cups all-purpose flour
– 1 ½ cups granulated sugar
– 1 teaspoon baking soda
– 1 teaspoon salt
– 1 teaspoon cocoa powder
– 1 ½ cups vegetable oil
– 1 cup buttermilk, at room temperature
– 2 large eggs, at room temperature
– 2 tablespoons red food coloring
– 1 teaspoon vanilla extract
– 1 teaspoon white vinegar
– For the Cheesecake Layer:
– 24 ounces cream cheese, softened
– 1 cup granulated sugar
– 1 teaspoon vanilla extract
– 3 large eggs, at room temperature
– ½ cup sour cream
– For the Cream Cheese Frosting (optional):
– 8 ounces cream cheese, softened
– ½ cup unsalted butter, softened
– 4 cups powdered sugar
– 1 teaspoon vanilla extract
Instructions
Creating Red Velvet Cheesecake is easier than you might think. Follow these steps to make your own:
1. Preheat the Oven: Preheat your oven to 350°F (175°C). Grease and line a 9-inch springform pan with parchment paper.
2. Prepare the Red Velvet Cake:
– In a large bowl, sift together the flour, sugar, baking soda, salt, and cocoa powder.
– In another bowl, mix the vegetable oil, buttermilk, eggs, food coloring, vanilla extract, and vinegar until smooth.
– Gradually add the wet ingredients to the dry ingredients, stirring until combined.
– Pour the red velvet batter into the prepared springform pan and smooth the top.
3. Bake the Cake: Place the pan in the preheated oven and bake for 25-30 minutes. A toothpick inserted into the center should come out clean. Remove from the oven and let it cool completely in the pan.
4. Prepare the Cheesecake Layer:
– In a large bowl, beat the softened cream cheese until smooth and creamy.
– Gradually add the granulated sugar and vanilla extract, mixing until combined.
– Add the eggs one at a time, mixing on low speed after each addition. Finally, mix in the sour cream until smooth.
5. Assemble the Cheesecake:
– Once the red velvet cake has cooled, pour the cheesecake batter on top of the cake layer in the springform pan.
– Place the springform pan in a larger baking dish filled with hot water (this is a water bath) to help the cheesecake cook evenly.
6. Bake the Cheesecake: Bake for 60-70 minutes, or until the edges are set and the center is slightly jiggly. Turn off the oven and crack the door, letting the cheesecake cool gradually for about an hour.
7. Chill: After cooling in the oven, remove the cheesecake from the water bath and refrigerate for at least 4 hours, or overnight if possible.
8. Prepare the Cream Cheese Frosting (if desired):
– In a bowl, beat the cream cheese and butter until creamy.
– Gradually add the powdered sugar and vanilla extract, mixing until smooth.
9. Serve: Once chilled, remove the cheesecake from the springform pan. If using frosting, spread it over the top and sides of the cheesecake for an extra touch.
- Prep Time: 30-40 minutes
- Cook Time: 60-70 minutes
Nutrition
- Serving Size: 12 slices
- Calories: 400 kcal (per slice)
- Fat: 25g
- Protein: 6g